This support article covers outlier scenarios that require you to navigate to the Required Document and make manual changes there.
Note: In 2022 we adopted the language Accepted or Rejected for uploads instead of Approved or Declined to avoid confusion with approving or declining an application. To keep things simple and backwards compatible, we only updated these labels in the application interface and not in Salesforce. Since this article references what you’ll see in Salesforce, Approved and Declined are mentioned.
All of your Required Documents can be found on the Related tab of your Service File.
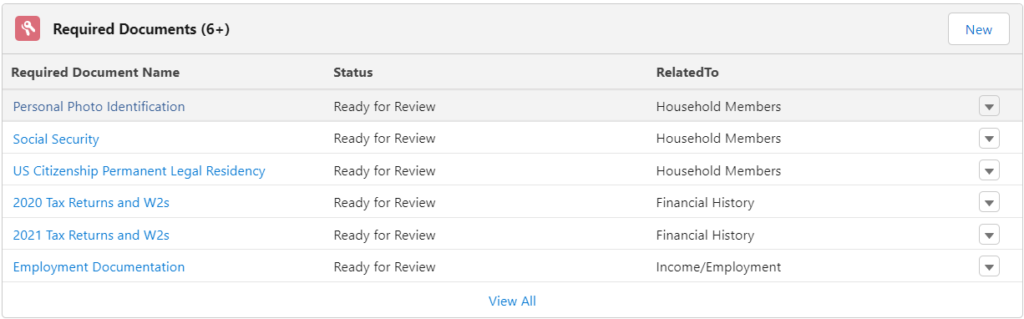
If an application has multiple Required Documents with the same name. You may need to open those Required Documents and scroll down to the Related Records section. Roll over the related records to see additional details (name of record) and make sure you are editing the correct Required Document.
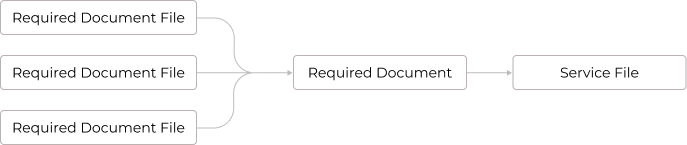
Details for each file uploaded to a Required Document are stored in a Required Document File.
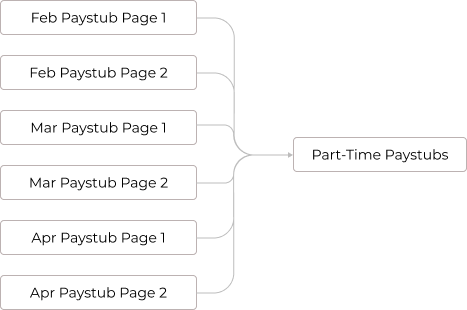
A Part-Time Paystub Required Document may have these related files.
Remember the Required Document: Status is informed by the Status Field on each of the child Required Document Files. If any Required Document Files have a Status that is not Approved, the Required Document: Status won’t be Approved.
Here is a list of scenarios you may need to troubleshoot:
- Deleting Required Documents
- Staff needs to reject approved documents
- Staff needs to approve rejected documents
- Applicants need to upload more than 15 files
- Staff cannot open a document to review it
- Staff encounters a password request or an encryption error
- Failed Upload Error
Deleting Required Documents
Deleting a Required Document will automatically delete the Required Document File records in Salesforce and also delete the actual files in cloud storage.
When deleting, consider if you need to update the Required Document Status.
When the application reloads, if the conditions for displaying the required document are still met, Public House will create a fresh new Required Document.
Staff needs to Reject(Decline) Accepted(Approved) documents
Navigate to the Service File > Related > Required Documents. You’ll need to identify the Required Document you need to change. You may have to dig into Required Documents with the same name to find the one you are looking for.
- Navigate to the Required Document Files
- Identify the file you would like to Reject
- Open the file and change the Required Document File: Status to Declined
- If all the other files uploaded to the Required Document are Required Document File: Status = Approved, you’ll need to change the Required Document: Status to Action Required
- You’ll need to also add Applicant Directions for the applicant to understand what the issue and solution are
- Revisit the application to verify your changes
Staff needs to approve rejected documents
Navigate to the Service File > Related > Required Documents. You’ll need to identify the Required Document you need to change.
- Navigate to the Required Document Files
- Identify the file you would like to Approve
- Open the file and change the status to Approved
- If all the other files uploaded to the Required Document are also Approved, Change the Required Document Status to Approved
- Revisit the application to verify your changes
Applicants need to upload more than 15 files
Public House limits the number of files an applicant can upload to insulate staff from extra confusion.
If an applicant needs to upload more than 15 files, review the current uploads to see if any are unnecessary and might be deleted to make more space.
You can also download and merge files. To merge or manage PDF files in Windows, you need either a free, but limited, third-party productivity app or one of the many well-designed commercial apps.
- You can use online tools like PDF Simpli or Small PDF
- You can download tools like PDFsam or PDF Merger & Splitter
Staff cannot open a file to review it
You may need to confirm the file exists in your cloud storage.
Staff encounters a password request or an encryption error
These days, most software creates PDF but not all of these adhere to Adobe’s PDF Standards. For this reason, Public House cannot detect every time there is password protection or the PDF is encoded/encrypted in a non-standard way.
If you encounter a password prompt, reject the file. Ask the applicant to open the document, remove the password protection and resave the document. Then they can resubmit the file.
If you encounter an encryption error, reject the file. Ask the applicant to open and resave the document in another PDF tool or open and print to PDF to create a new version. save without the password.
Failed Upload Error
It is the internet and with the high volume of uploads, occasionally an upload will hit an error. In this case, the applicant is immediately notified and requested to try again. They will not be able to submit an application with a Failed Upload Error.