Required Documents are set-up and managed through the ‘Required Document Templates’ section in Salesforce. A template is created for each document and clients control the settings for where and when the document appears in the application, the explanation text the Applicants see, the ‘I don’t have it’ text and help text for staff.
REMINDER: the actual document templates are stored in the clients cloud storage or a private section on a company website.
Report: Required Document Templates
Creating & Editing Required Document Templates
- To edit an existing Required Document, head to Reports and open the Required Document Templates report. Open the existing template from the report and select ‘edit’.
- to create a new Required Document. Select ‘New’ from the Required Document primary Salesforce section and a new Required Document Template window displays with information tips.
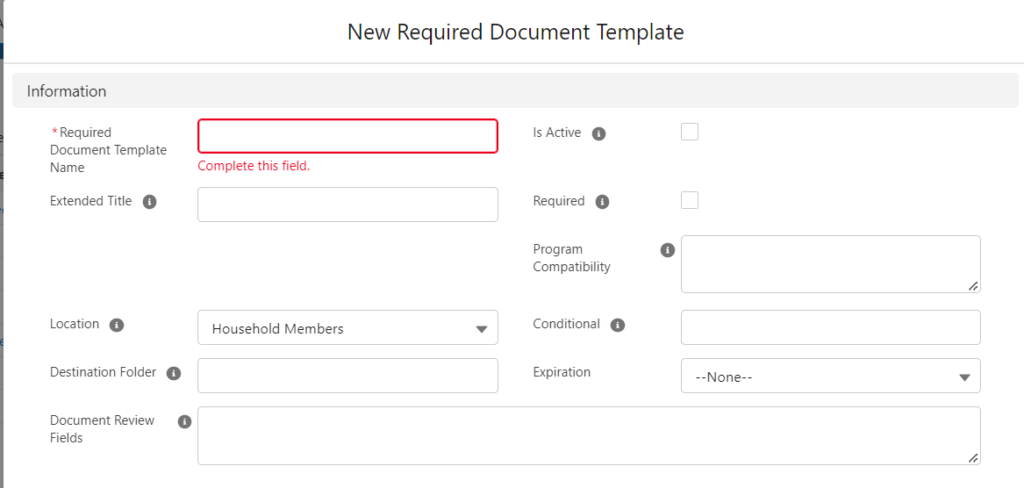
- Enter the required details about the document
- Add the Program Type(s) or Communities associated with the Required Document.
Required Document Template Metadata Fields
Details:
Required Document Template Name: The reference name for the Required Document. 40 Character limit.
Extended Title – A more detailed Required Document Name that displays on the application, although it can be the same as the template name. Created as a workaround to the standard 40 character limit of Salesforce’s standard label Field. Max 255 characters
Location – Designates the section of the application portal the Required Document appears and corresponds to which Object the Required Document is related. Select from the drop down list.
Destination Folder – Name of the cloud storage folder created to store files uploaded as this type of required document. Check out Folder Structure if you to review of the nested folder structures. Typically this is an abbreviated version of the document name. Each Required Document should have a unique destination folders.
Document Review Fields – A list of application details displayed for staff to expedite document review. Review the nuances of these fields here- Document Review Fields.
Is Active: – Check if Required Document should appear at all. Note: If a Required Document template is changed from Active to Inactive, any existing Required Documents will be deleted along with any files uploaded to the cloud storage.
Required: If the checkbox is selected (true), the Application cannot be submitted without uploading files for this Required Document. This Required Document appears with the red clock icon on the application. If the checkbox is not selected (false), the document is Optional and the Document appears with an orange icon. It is not required in order to submit the application for review. Editing this setting does not delete any existing document uploads.
Program Compatibility: A comma-delimited list of all Service File Programs that should include the Required Document. Program Names must be an exact match. If blank, the Required Document will be included in all Programs.
Conditional Fields: Optional custom checkbox Field that can determine specific conditions for creating a Required Document. They are a little tricky so check out the full Conditional Fields article.
Expiration: Determines when the document is re-set. Select either Expire on Re-set or Expire on a date from the drop down options. If neither is selected, the Required Document will not expire.
Descriptions:
Requirement Description – Simple but detailed instructions of exactly what the applicant should upload. Supports basic HTML. This is where you would link to a document template for an applicant to complete and then upload. If the document is optional, clearly explain the circumstances when it should be completed.
Staff Instructions – Foolproof document review for staff by outlining the specific procedures for each Required Document. Displayed to staff after the applicant has Submitted for Review.
I don’t have-Instruction – Directions to assist Applicants in obtaining/replacing required materials.
TIP: To create new documents that are similar to existing ones or even ones in the same application locations, use the ‘Clone’ button on an existing Required Document to duplicate the required document template details and descriptions and then edit the fields as needed for a new document
Best Practices for creating Required Documents
- Keep it simple!
- Leverage Required Documents for complex questions not supported in the applications. Examples – long narrative information like – Letter of Need is better supported as a Required Document than as an application question; Residential History would be an unnecessary mess to store years of addresses and landlords as child records for each residence when organizations are simply trying to establish a length/consistency of residency. Create a Required Document and a PDF for Applicants to fill out.
Required Document Template Customizations
The Required Document Templates are associate with specific rental or homeownership programs by utilizing the Program Compatibility Field- if the program type is listed in the Field, the Required Document is available for the application.
An additional customization is available for clients with a large variety of program types that require unique document requirements. For example, some national rental clients must use specific required documents for a program in a particular city. Public House can add an option to associate specific programs or communities to a Required Document Template while using the same Service File Program so the document is only available if it is associated with a particular program type or community, regardless of the entry in Program Compatibility Field.